Overview
Values for Attribution Types are called Attribution Type Objects, e.g. for the Department Attribution Type can have objects like Medicine, Surgery, OB/GYN, Pediatrics. This document explains how to import and export these values from a Text file or from an XML file.
You can also manually create Attribution Type Objects from Managing Attribution Type Objects.
Only users whose roles are not facility-specific can import/export Attribution Type Objects as the imported/exported Attribution Type Objects have enterprise-wide scope. Unless activated Attribution Type Objects can only be imported and exported from XML files.
1.Text import comes as a part of the application, need not be activated separately
2.Allows updates to be performed i.e. if an Attribution Type Objects already exist, user has the option to either skip or update them with new values. Thus if a Facility gets new Resident doctors they can update PDA Professional with it.
3.Allows multiple column data to be imported to a single property. e.g. if in your text file you have last name and first name in two separate columns you can configure the import to concatenate them and import them to a single Attribution Type Property. With previous version you had to first concatenate them into a single column on your own and then import the file.
4.Has the capability to import more than one Attribution Types from a single file based on defaults specified.
Steps
To access the dialog choose the Tools tab-> Management Console and then Import from the main menu. Use CSV import if you want to import Attribution Type Objects from a comma delimited (CSV) file created from your host system. Similarly use CSV export to extract data out from PDA Professional, so that you can use it for your own reference in another system. Use 'XML import export/import format' to import/export from other system.
Exporting
|
1.Attribution Type: Choose the Attribution Type that you want to export from the combo box.
2.Action:
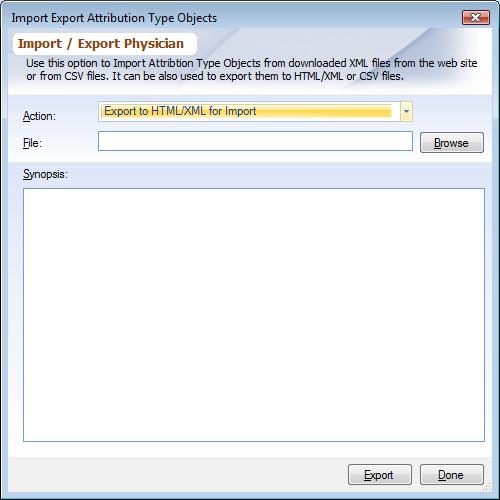
a.Choose 'Export to HTML/XML for Import' to export to an XML file. When exported to this format, 3 files are created:
a..HTML: Contains the html document for the Attribution Type Objects. Open this file to view the exported Attribution Type Objects in your browser.
b..XML: Contains the Attribution Type Objects. Use this file to import a Attribution Type Objects using the steps importing section below.
c..CSS: Contains formatting instructions.
b.Choose 'Export to Text' to export to a comma separated text file.
3.Filename: Enter the filename and the folder where you want to export the Attribution Type Objects.
4.Synopsis: Synopsis describes the purpose of the Attribution Type. Here you can describe why you created this Attribution Type and some hints on how to use it. It is optional, but recommended, as it will help the people who intend on using it.
5.Export: Click 'Export' to start the export.
Importing
|
1.Attribution Type: Choose the Attribution Type that you want to import from the combo box.
2.Action:
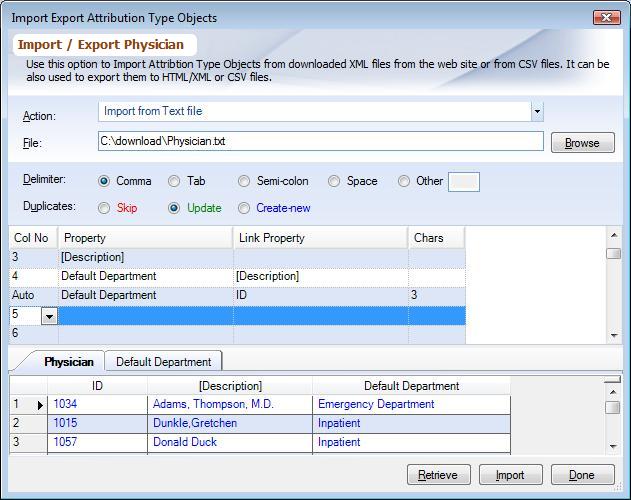
a.Choose 'Import from XML' to import from an XML file.
b.Choose 'Import from Text' to import from a text file.
3.Filename: Enter the filename and the folder from where you want to import the Attribution Type Objects.
4.Delimiter: If you are importing a text file you will can choose how fields are delimited.
5.Configure: Specify which column in the file contains which property, use the guidelines below:
oColumn No.: Choose column no. of the text file that you wish to be the first property. If set to 'Auto' the column value will be generated by the program automatically. For ID column Description is truncated to the number of characters defined. 'Description' column is auto generated by appending the word 'Description' to the ID column.
oProperty: Choose the property from the drop-down box for this column. If a property needs to be concatenated for more than one column specify it twice. e.g. If the Physician name is in column 2 and 3 (last name and first name). Specify the 'Description' in two rows.
oLink Property: If this property is of the type 'Object' you can import that too. e.g. if the Physician file you are importing has default departments or specialty specify that here. It will also be imported along with the Physician, Departments and Specialities.
oNo of Characters: If generating a property based on the description specify the first n characters here.
6. Duplicates: Use this option to select how Attribution Type Objects should be handled if it already exists in the system. Duplicate objects are checked using the internal 36 characters Plato ID or the Quick Property typically the ID.
a.Skip: Choosing this option will skip an existing Attribution Type Objects.
b.Update: Choosing this option will update the existing Attribution Type Objects.
c.Create New: Choosing this option will create new Attribution Type Object if it already exists.
7. Retrieve: This will retrieve the data from the file and display in the table below. The rows are color coded, which tells how the data will be imported:
a.Red: Attribution Type Objects will be skipped.
b.Green: Attribution Type Objects will be updated with the new data.
c.Blue: New Attribution Type Objects will be created.
8. Import: Verify that the data displayed in the table is correct click on 'Import' button to start the import process. If the import is successful the configration will be saved so that you do not have to reconfigure it when you import it the next time.

