OVERVIEW
The Plato Data Analyzer is an innovative and unique tool for the collection and statistical analysis of data. This training guide has been designed as a quick, easy-to-use tool that assists in learning the Plato Data Analyzer Professional application.
WORK ENVIRONMENT
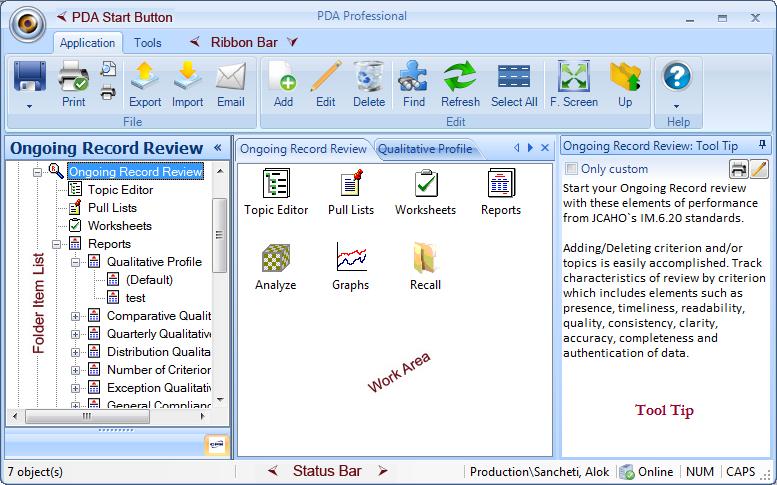
The top section displays the main menu and the toolbar. Menu and toolbar options work in the context of the current module active in the application. For example, if the Worksheet is currently in the active module, clicking the 'New' button will create a new worksheet. However if Topic Editor is currently the active module, clicking the 'New' button will create a new criterion. To get familiar with each of the menu options read Menu And Toolbar Items.
FOLDER ITEM LIST
The left section displays the Folder Item list, which lists the Review Template and the Global nodes. The work environment has 3 major sections:
▪Global
▪System Administration (accessed from the System menu)
The work area occupies most of your screen; this is the section where you will interact with most. If you are creating or editing Topics And Criterion, the Topic Editor will be in this area. If you are adding data to a Worksheet Worksheet Data Entry will appear in this area. You can choose actions for the work area either from the main menu or by right clicking and choosing from the context sensitive popup menu.
Most of what you can do from a right-click menu you can also do from a main menu and toolbar, or by using a keyboard shortcut. Use whatever method is most convenient for you.
TOOL TIP
Tool tip provides a quick overview of the current module. You can customize the tool tip and adding your own custom tool tips. Further if you do not wish to view tool tips built into the system, you can check the box 'Only custom'. The system will then display only tool tips that you have set. In the worksheet area it provides tool tips set for each of the criterion in the topic editor. A good custom tool tip will be a synopsis for a Review Template, explaining its reason and how it should be used.
A Review Template is the 'template' for the study being created. Review Templates are created by defining which fields will be used to enter data into the Worksheet then Topics And Criterion are imported from the Global Topic Editor defining the specific Criterion to track data against.
Global:
The area where Global Topics are created, account information is stored, and reporting across multiple Review Templates is accomplished.
▪Topic Editor: Global provides full control over the 'Topics' which includes creating, renaming, deleting, etc.
▪Account: Table where all patient related data is stored which is populated through worksheet data entry
▪Reports: Designed to report on data across multiple Review Templates
▪Analyzer: A tool that allows you to redefine the way you view your data across multiple Review Templates
▪Recall: Simply allows you to Recall your saved Standard Report, Data Analyzer or Graph
|
This section includes the Attribution Types and Security for the Plato Data Analyzer.
▪From the toolbar, click the Tools tab and then Management Console
SECURITY
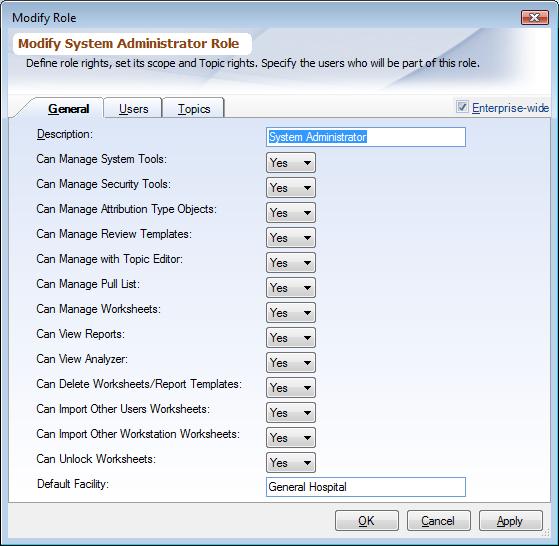
User defined roles that determine the level of permissions a user might have. These might consist of Manager, Technician, etc… Review Template, Topic or Criterion and Worksheets are also given specific system permissions under Roles.
ADDING A ROLE:
▪From the toolbar, click the Tools tab and then Management Console
▪From the folder Items list, under Security, double click on Roles
▪From the toolbar, click on 'New' provide a description for the role such as Technician...
▪Click the General tab to establish the various permission levels by clicking on the appropriate box
▪Click the Users tab to assign which users should be included in this role by clicking on the indicator to the left of the user ID. If the user will be assigned in multiple roles, you will need to assign which role would be the default, which automatically gives rights to newly created topics.
▪Click the Topics tab to assign rights for each topic. By clicking on the bold None it will set the rights for all topics or you can click on each topics and set each roll separately. Select: None- (No access), Read Only, Read Write, or Full Access (Read/Write/ability to assign rights) for various Roles defined.
ENTERPRISE WIDE:
•Checking the Enterprise wide box will determine whether that Role will have access throughout the entire enterprise of facilities.
•Unchecking the box allows you to make that Role facility specific i.e., to choose which facilities will have access to that Role. A Facilities Specific tab will appear. Choose the desired facility.
|
EDIT A ROLE:
▪From the toolbar, click on the Tools tab and then Management Console
▪From the folder items list, click on Roles, in the Worksheet Work Area select a description and right click, select 'Edit'.
DELETE A ROLE:
▪From the toolbar click on the Tools tab and then Management Console
▪From the folder items list, click on Roles, in the Worksheet Work Area select a description and right-click, select 'Delete'.
PRINT ROLE REVIEW TEMPLATE RIGHTS:
You can print which Review Templates are assigned to which role.
▪Click on the Start up button and then click Role Review Template Assignment
▪Click on Print and then choose desired function
Defines various permission levels used throughout the Plato Data Analyzer, which are maintained in Management Console. Users are created only by those individuals whose role provides for managing System Tools.
ADDING A USER:
▪From the toolbar, click on the Tools tab and then Management Console
▪From the folder items list, under Security, double click on Users
▪From the toolbar, click on 'New'
GENERAL Tab:
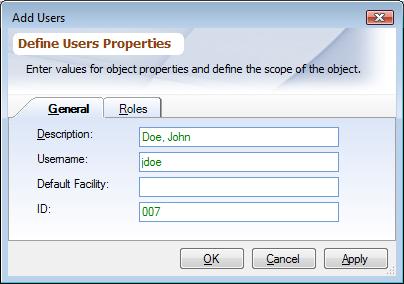
Click on this tab to enter the information pertinent to the User
▪Description: The name of the user being set up; Last Name, First Name
▪Default Facility: Set the User’s Default Facility. The default facility is tied to Worksheet Data Entry. The facility specified here will automatically display in the worksheet when adding a new worksheet.
▪User Name: The User’s Login Description Note: The first time the user is set up, their password is equivalent to the user name and they will be prompted to change it.
▪E-mail: Enter the users e-mail
|
ROLES Tab:
Click on this tab to select the appropriate Role for the User. A User may be assigned to more than one role and one role can be determined to be the default role. When a new topic is created by a user, the rights given to the topic are based on the user’s default role.
EDIT A USER:
▪From the toolbar, click on the Tools tab and then Management Console
▪From the folder items list, under Security, double click on Users
▪Highlight the user by clicking on it. Right-click, choose 'Edit' to make changes
DEACTIVATE A USER:
▪From the toolbar, click on the Tools tab and then Management Console
▪From the folder items list, under Security, double click on Users
▪Highlight the user who is no longer accessing the system, right click and choose Deactivate Attribution Type or highlight the user and from the toolbar, click Delete.
The user will be moved to the Attribution Type Deactivate
CHANGE PASSWORD FOR THE USER:
•From the toolbar, click on the Tools tab and then Management Console
•From the folder items list, under Security, double click on Users
•Highlight the user by clicking on it. Right-click, choose Reset Password to make changes
SET PASSWORD PARAMETERS FOR USERS:
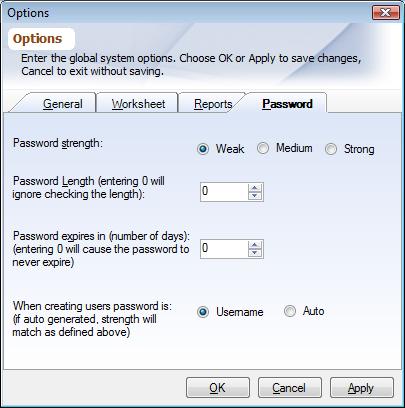
•From the toolbar, click on the PDA Start Button and then 'Options'
•From the dialog box, click the Password tab. Password strength is displayed at the time of logging on and changing password.
•You can choose to set the password strength to weak, medium, or strong
•Set the required days until password expires
•Choose whether the system will automatically generate a password for the users or allow them to create their own.
|
Setting password parameters requires a higher level administrative sign-on.
ATTRIBUTION TYPES (System Tables):
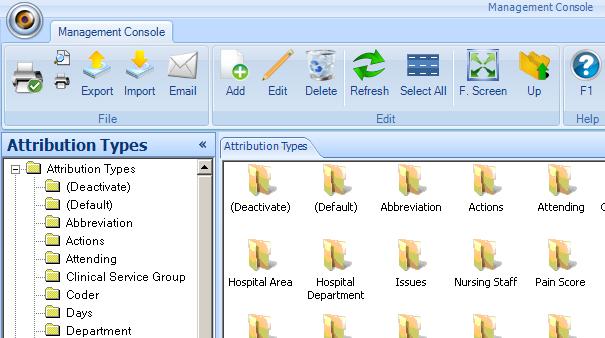
These tables are user defined and built under Managing Attribution Types. Attribution Types can be applied to any worksheet header or criterion fields. Once created, the tables can be found by clicking on the Tools tab and then Management Console. There are predefined Attribution Types that come with the system that cannot be changed. These are Facility, Practitioner, Unit, Department, Default, Deactivate, Roles, and User.
|
ADDING A VALUE TO AN ATTRIBUTION TYPE:
•From the toolbar, click on the Tools tab and then Management Console
•Click on a specific Attribution Type, (Little yellow folder) to open. From the toolbar, click 'Add' or right click in the Worksheet Work Area and choose 'Add' to add a new value. If the value is facility specific, uncheck the Enterprise Wide box. A Facilities Specific tab will appear. Choose the desired facility.
EDITING VALUES IN AN ATTRIBUTION TYPE:
•Click on the specific Attribution Type, (Little yellow folder) to open. From the toolbar click on 'Edit" or highlight and right click on value and select 'Edit'. Make desired change and click 'OK'. If facility specific values need to be added/changed, make sure the Enterprise Wide box is unchecked, a Facilities Specific tab will appear. Choose the desired facility.
DELETING VALUES FROM AN ATTRIBUTION TYPE:
•Click on the specific Attribution Type, (Little yellow folder) to open. From the toolbar click on 'Delete' or highlight and right click on value and select 'Deactivate'. The deleted value will move to the Deactivate Attribution Type folder.
DEACTIVATE ATTRIBUTION TYPE VALUES:
▪A value in an actual Attribution Type can be deactivated (and still reported on) once deactivated; the value is stored in the Deactivate Attribution Type folder.
ATTRIBUTION TYPE OBJECT USAGE:
You can see how many time a particular attribution type value has been used
▪Click on the specific Attribution Type, (Little yellow folder) to open
▪From the right side of the screen choose a value and right click and choose Edit
▪Click on the Usage tab this will tell you how many times this value has been used in the Worksheet Header fields and Worksheet Criterion fields.
REPLACE AND DEACTIVATE:
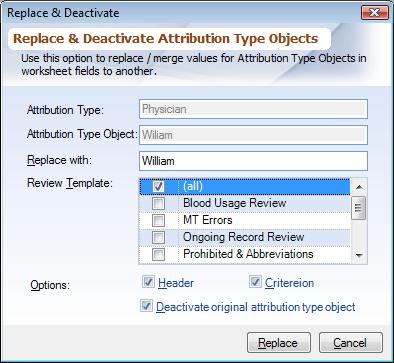
You can replace an Attribution Type value for another
▪From the toolbar, click on the Tools tab, and then Management console
▪Click on a specific Attribution Type, (Little yellow folder) to open.
▪From the right side of the screen choose a value and right click, choose Replace and Deactivate
▪Complete the 'Replace With' box with the new attribution type object
▪Choose desired Review Template(s) to replace with new attribution type object
▪Choose to replace in the Header and/or Criterion fields and then check the box, "Deactivate original attribution type objects.
|
REACTIVATE A VALUE:
▪Highlight the value in the Deactivate Attribution Type folder, right-click and select Restore.
COMPLETELY REMOVE A VALUE:
a value from the system, highlight the value in the Deactivate folder and select Delete. This should only be completed if you are sure that the value is NOT associated with a worksheet
Refresh: If data doesn't display, click Refresh to view.
MANAGING TOPIC EDITORS GLOBAL AND LOCAL
TOPIC EDITORS are the tools used for creating, editing and deleting topics and their associated criterion. There are two types; Global and Local. Global Topic Editor provides full control over the Topics which includes creating, renaming, deleting etc.
LOCAL TOPIC EDITOR: is limited to use within a particular Review Template. Using the Local Topic Editor, you may import Topics for use by a Review Template remove Topics from use by Review Templates; Add, Change, Delete and Reorder Criterion to Topics used by the Review Template. However, it is important to note that any changes made at the Local Topic Editor will affect the Global Topic Editor and also any other Review Template where the topic is shared.
GLOBAL TOPIC EDITOR: The tool by which the Topic is created. Topic can ONLY be created and deleted in the Global Topic Editor. Topics are imported into, or removed from, a particular Review Template. Topics can be shared in multiple Review Templates and results of data entry is aggregated in Global Reporting and Analyzing. Criterion can be created and modified in the Global or Local Topic Editor of the Review Template once a Topic has been created in Global.
TOPIC DESCRIPTION/HEADING: Forms the high level sections within studies and represents the sections that you would want to include or exclude from a specific Review Template and Reports on demand.
CREATING A TOPIC DESCRIPTION/HEADING The Topic is a title/header or (parent) of a section, not an actual Criterion.
•From the folder items list, click on Global and than Topic Editor
•From the WorkSheet Work Area, right-click, select 'Add Topic'
•Enter Topic Description, this is the full text long description of the topic/heading. This feature comes with a built in Spell Checker. This can be turned on and off from the Options dialog box.
Continue on to complete the following sections:
Standard Number for Criterion:
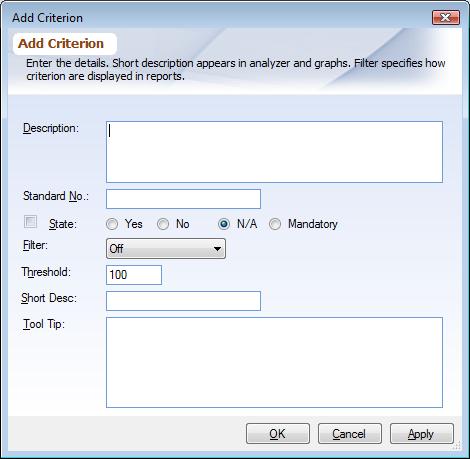
For each criterion you can associate a Standard No. This can also be used for storing EP numbers. These are prefixed before the criterion description in the Standard Reports
▪State/Default Value: Criterion may be set to either Yes (![]() ), No (
), No (![]() ) or N/A (
) or N/A (![]() ) . You may preset Topics And Criterion to any of these values so as to make Worksheet Data Entry more convenient. Setting the default value to mandatory (
) . You may preset Topics And Criterion to any of these values so as to make Worksheet Data Entry more convenient. Setting the default value to mandatory (![]() ), ensures that the criterion is not left at its default value.
), ensures that the criterion is not left at its default value.
▪Filter: The 'Filter' provides various options for reporting purposes and appears in Standard Reports and Data Analyzer. The options include:
▪On: (For Standard Reports, Criterion will be indented if parent is 'On' and children are 'Off')·
▪Off:
▪Display Only: The heading will display; however no results (i.e., threshold, Yes, No) will display. Typically topics whose numeric data is not important can be specified as Display Only (Criterion will be indented when this option is utilized if the children are set to off)
▪Archive: "Criterion": Topics And Criterion that is old and no longer relevant can be specified as Archive. Once specified, the Criterion will appear, with a strikeout, and no data entry will be allowed against the "criterion": Topics And Criterion. Any criterion archived will not appear in the worksheets for worksheet data entry.
▪Never: When a Criterion filter is specified as 'Off' it still appears in the report if its topic is 'On' or on 'Display Only'. If you do not want this Criterion to appear anytime in reports or analyzers, set it to 'Never'.
▪Threshold (Benchmarks or Triggers): A user defined value representing the minimum threshold of compliance allowed.
▪Short Description: This description appears in Data Analyzer and Graphs. It will only take the first 25 characters from the log description.
▪Make changes in the Short Description box to so that it makes sense in your analyzer cube and your graphing.
▪Tooltips: For each of the modules there is a tooltip available. The tooltip provides a quick overview of the module and gives a link for detailed instructions. You can further customize the tooltips for your organization.
▪Tooltips: With each Criterion you can associate a tooltip. This will appear along the right side of the data entry screen. Tooltips can be used to describe the criterion or to give instructions to people doing data entry on how a particular criterion should be evaluated.
|
ADD CRITERION:
These are the actual elements we are interested in tracking, capturing data for, and reporting on.
•Highlight the topic/heading and right click and choose 'Add Criterion'
•Enter criterion or (child)
ADD SUB CRITERION:
▪Highlight the criterion and right click and choose 'Add Criterion'
▪Enter criterion or (child)
See picture above and complete each box as described, e.g. Standard, State, Filter, Threshold, Short description, and Tooltip.
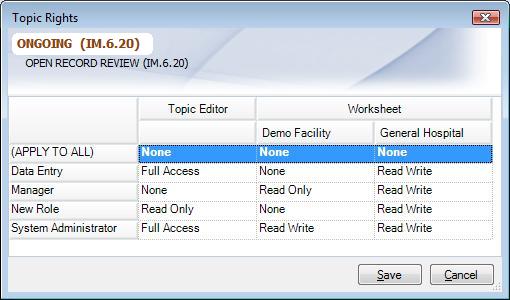
ASSIGN RIGHTS TO TOPIC DESCRIPTIONS/HEADING FOR EACH ROLE:
Describes who has access to the various topics based on roles.
▪Topic Editor Column:
•In the Worksheet Work Area highlight the Topic and right click and choose Assign Rights or select Assign Rights from the little toolbar.
•None: Cannot access the Topic.
•Read-only: Can only view the Topics and Criterion and include them in a Review Template, but cannot make changes to it.
•Read-write: Read-only + Ability to make changes to Topic or Criterion.
•Full Access: Read-write + Ability to further assign rights to other roles and delete the Topic from the 'Global Topic Editor' database. The user who creates a Topic its default role automatically gets full access to that Topic.
▪Worksheet Column:
•None: Cannot access the Topic.
•Read-only: Can only view the Topics and Criterion and include them in a Review Template, but cannot make changes to it.
•Read-write: Read-only + Ability to make changes to Topic or Criterion.
|
TOGGLE LOCK:
Locking provides a mechanism for one user to update a topic at a time.
▪Select a Topic, right-click choose Toggle Lock to unlock or choose Toggle lock from the toolbar.
PRINTING A TOPIC CRITERION:
This will create a paper worksheet; from Global it will print all topics. From a specific Review Template, it will only create a paper worksheet for the specific study/review.
Click the 'Print' icon from the toolbar
▪SELECTION Tab:
•Print Topics Only: if checked, will print only the topics within the ReviewTemplate/Global.
•Print Each Topic on a New Page: if checked, will create a new page for each new Topic
•Repeat Criterion specific fields before each topic: if checked, the criterion fields will appear before each topic making up the worksheet or before each repeating topic instance
•Print Short Description Instead of Long Description: If checked, will print the short description instead of the long description
•Skip Worksheet Criterion fileds: If checked, the fields you chose on a worksheet criterion level will not appear in the printed hard copy.
▪PULL LIST TAB:
•Select the Pull list you would like to print along with the specific profile.
•Choose All or Selected records
•Click Print
▪TOPICS Tab:
•Choose which topics to be included and/or how many times you want the topic repeated.
CHANGING THE STRUCTURE OF A TOPIC
Deleting and Moving Criterion:
The study structure can be changed by relocating criterion, deleting them, etc. Changing the parent relationship will require the worksheets be synchronized to the new structure and may change the relationship of the data. Any changes made in a Review Template will affect the Global Topic Editor and vice versa as well as any other Review Template this topic might be involved in (provides for standardization)
▪To delete a single criterion; select criterion, right-click and select Delete-> Delete selected only. If there is sub criterion choose 'Delete this and sub criterion'
▪To delete a topic or criterion, along with any sub criterion; right click and select Delete-> 'Delete this & sub-criterion'
▪To move criterion; select criterion, right-click, select Move Up, Move Down, Move Left, Move Right, Move criterion to another Topic
•Highlight desired criterion and right click. Choose 'Move' and then 'Move to another Topic'
•Choose desired Topic and click OK.
Topics must be unlocked to appear in the 'Move Criteron' dialog box.
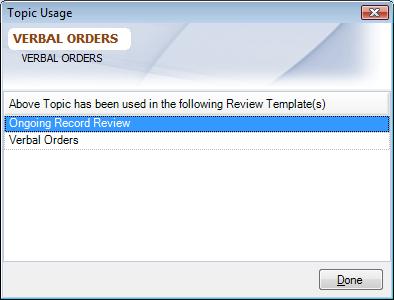
TOPIC USAGE:
Lists all the Review Templates that are using this topic, even if a current user does not have access to them.
▪From the toolbar, click on View-> Topic Usage or in the WorkSheet Work Area, right and select View-> Topic Usage
o
|
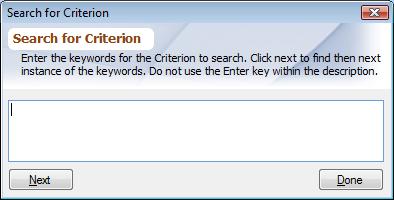
SEARCH:
You can search for a Criterion for keywords using this option. This will allow you to quickly search for Criterion, if you have a long list of Topics And Criterion. From the main toolbar, click 'Search' (![]() ). In the dialog enter the part of the description or keyword for the Criterion. Click 'Find' to find the first Criterion matching it; click 'Find Next' for the next one.
). In the dialog enter the part of the description or keyword for the Criterion. Click 'Find' to find the first Criterion matching it; click 'Find Next' for the next one.
|
DELETING A TOPIC: Deleting a specific topic from Global will completely remove the topic from the Plato Data Analyzer. Topics can only be deleted from the Global Topic Editor.
▪From the Global Topic Editor, click on desired topic, right-click, select Delete-> Delete this and sub criterion
MANAGE REVIEW TEMPLATES
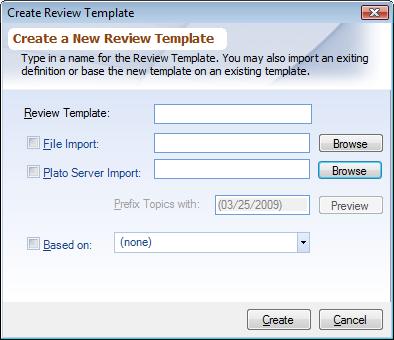
CREATING/NAMING A NEW REVIEW TEMPLATE:
A Review Template is the template for the study/review being created. Defining the data field to track for a Review Template worksheet, then importing topics already created to use from the Topics database creates Review Templates.
▪From the folder items list, highlight the words Review Template then from the toolbar, click on New
▪Name the Review Template. A template can be based on another template (this will copy the fields and the topics from an already existing study to the new Review Template). If not, just click 'OK' or
▪Import a Review Template from within the application: Highlight the words Review Template, from the toolbar, click 'Add' and then check the box next to 'Plato Server Imports' and then click on Browse
|
CREATING A LOCAL REVIEW TEMPLATE:
This step will define the topics/criterion for a review template. Topics are first created in the Global Topic Editor then imported into the Review Template Local Topic Editor. Criterion can be created and modified in the Global or Local Topic Editor of the Review Template once a Topic has been created in Global. However, it is important, again, to note that any changes made at the Local Topic Editor will affect the Global Topic Editor and also any other Review Template where the topic is shared.
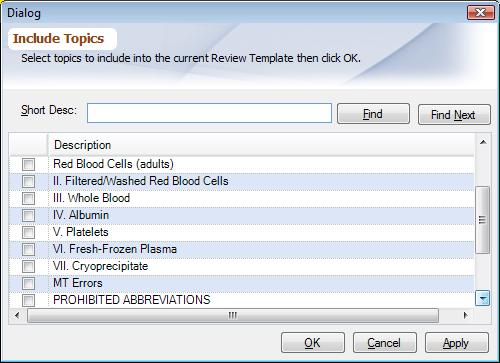
INCLUDING TOPICS to a New Review Template:
▪From the folder items list, click on the desired Review Template and then click on the Topic Editor icon
▪From the work area right click and select, Include Topic
▪Select topics to include into the current Review Template than click 'OK' (this is a list of topics that were created in the Global Topic Editor).
▪Click Save.
|
MANAGE REVIEW TEMPLATE ASSIGNMENT DIALOG BOX:
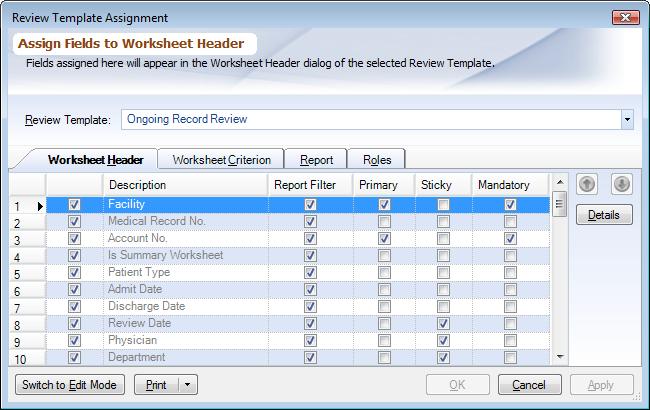
Here you define the fields that will make up the WorkSheet Header for the Review Template. These fields represent case identification or demographic information that doesn’t usually change throughout the worksheet.
oWORKSHEET HEADER Tab:
▪From the bottom of dialog box click on 'Switch to Edit Mode'
▪From the Worksheet Header tab, select those fields that will be part of the worksheet header
▪Use the buttons on the right to move the fields up or down based on desired position in the worksheet header
•Report Filter: Determines which fields will appear in the Header/Criterion filter options when generating reports
•Click on Yes or No to specify which fields can be reported on in any of the reports. Setting this to 'Yes' cause this field to appear as a Worksheet Header filter option in the Standard Reports and Data Analyzer parameters dialog. If set to 'No', this field will not appear
•Primary Field: Primary Field differentiates one account from another, thus avoiding duplicates in the worksheets. To best avoid duplicates, choose the Account Number as the primary field. If Account Number is not used, define Medical Record Number and one other field such as Admit or Discharge Date both as primary. A new worksheet will be created for each new episode entered into the review. Also see Auto Generate
•Sticky: Defines which fields will default from one worksheet to the next. Click on Yes to define a field where the values from the previous worksheet will default into the next worksheet.
•Mandatory: Establishes whether or not a field will be required.
•Auto Generate:The Auto Generate field will automatically generate unique values. This can prove very beneficial to be used as a primary key in a Review Template where no other unique field(s) can be identified.
|
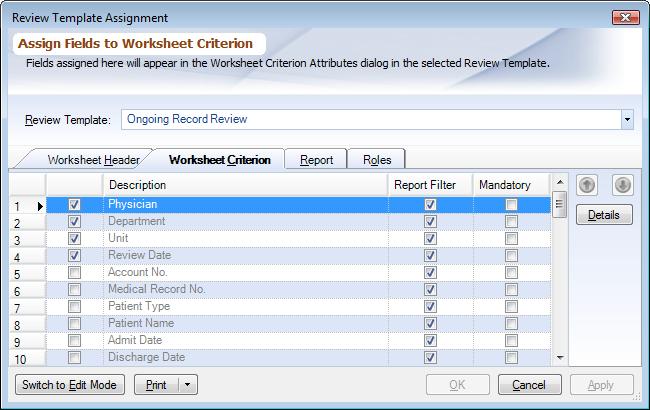
WORKSHEET CRITERION Tab:
These fields create the 'columns' in the worksheet and are values that could potentially be different for each criterion. For example, a practitioner for an H&P may be different than a practitioner for a Consultation. Practitioner would need to be selected as a worksheet criterion field.
▪From the Worksheet Criterion tab, select those fields that will be attributed at a criterion level
▪Use the buttons on the right to move the fields up or down based on desired position in the worksheet criterion
▪Report Filter: Determines which fields will appear in the Header/Criterion filter options when generating reports.
▪Click on Yes or No to specify which fields can be reported on in any of the reports. Setting this to 'Yes' causes this field to appear as a Worksheet Header filter option in the Standard Reports and Data Analyzer parameters dialog. If set to 'No', this field will not appear. As a general rule, any field that is contained in both the Worksheet Fields section and the Criterion Fields section (such as physician and department) the header field should be set to 'No'
▪Mandatory: Establishes whether or not a field will be required.
Worksheet field Update date: Update date can be defined both at the worksheet header and criterion level. This field when included, as a part of Review Template definition will automatically track when the last time a worksheet and/or criterion was updated.
|
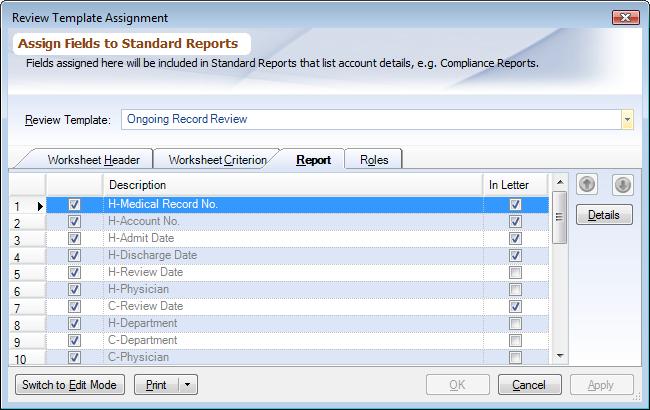
oREPORT Tab:
•
Defines which fields will be included in the Compliance and Worksheet Assigned reports.
▪Click on those fields; H-eader or C-riterion that you would like displayed. The first two fields selected will produce how the report is sorted. The rest of the defined fields will be the output of the report.
▪Use the buttons on the right to move the fields up or down based on the desired columns to display the information
|
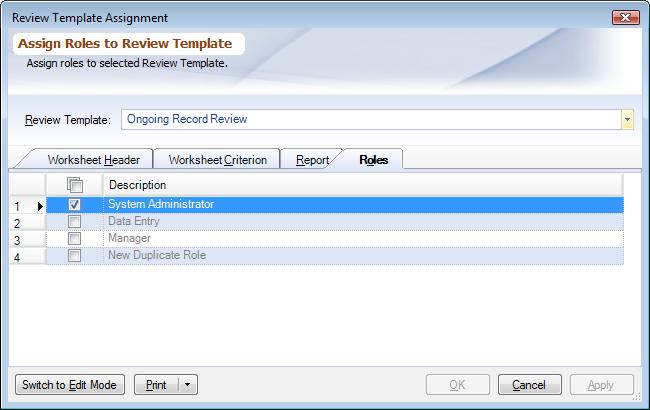
ROLES Tab:
Defines the roles or group of users that will have access to the Review Template.
▪Assign the [Role(s)] for the specific Review Template by clicking on the indicator.
▪Click 'Ok' to save:
To access the Review Template Assignment dialog box from the application, click on the PDA Start Button and then, Review Template Assignment
|
REVIEW TEMPLATE COMPONENTS:
Once saved, the new Review Template will appear in the folder items list and in the work area. Double click on the new Review Template and five icons will be displayed as part of the Review Template
|
▪Topic Editor (Local): Topics/Criterion are Imported from the Global Topic Editor to define the criterion within a template for the study/ review
▪Worksheets: The location where data is entered into the system against the topics/criterion established for the specific Review Template.
▪Pull List: Pull List allows managers to create a list of Worksheets, they want to be reviewed
▪Reports: Designed to report on specific data entered from a Review Template
▪Analyze: A tool that allows you to redefine the way you view your data
▪Recall: Simply allows you to save and Recall your Reports, Data Analyzer or Graph
UPDATING/EDITING REVIEW TEMPLATE VALUES:
▪From the toolbar, click on the PDA Start Button and then "Review Template Assignment:"ManagingReviewTemplateAssignment
▪Select the Review Template from the drop down arrow to modify, click on Switch to Edit Mode; make desired changes
REMANING A REVIEW TEMPLATE:
▪From the folder items list, select a specific Review Template and highlight.
▪From the toolbar, click on Edit, make desired changes and then click Rename.
WORKSHEET FIELD USAGE:
This report will allow you to print details about worksheet fields and in which Review Templates they are used.
•From the toolbar, click on the PDA Start Button and then Review Template Assignment.
•Click on Print and then Preview
•Choose study and then click Preview
CREATING A REVIEW TEMPLATE PROFILE:
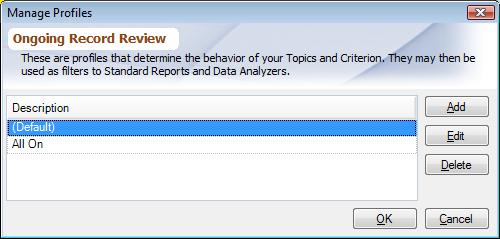
"ManagingReviewTemplateProfiles" While in "Local Topic Editor": Review Template (a specific study) you have the ability to save a combination of Reporting Filters for "recall:" SavingAndRecalling". These profiles may then be used as filters for Standard Reports and Data Analyzers. It creates and stores a desired 'view' of a report.
•From the "work area": Worksheet Work Area click on 'Manage Profiles', click 'Add' to name the profile then click 'OK'
•From the Review Template box, click on down arrow and select the new profile.
•Change the report filters (i.e. OFF/ON status) for the "criterion": Topics And Criterion to create the 'view' desired
•Make changes and click Save
*A new profile can be selected in Reporting using the 'Topics' tab and selecting the desired 'Profile' from the drop down list
oClick on 'Manage Profiles' again to 'Edit' name or 'Delete' to eliminate profile
o
|
TOGGLE LOCK:
Locking provides a mechanism for one user to update a topic at a time.
▪Select a Topic, right-click choose Toggle Lock to unlock or choose Toggle lock from the toolbar.
PRINTING A REVIEW TEMPLATE:
You may print a Review Template for reference or for use as a paper worksheet.
▪Click on the 'Print' icon
SELECTION Tab:
▪Print Topics Only: if checked, will print only the topics within the ReviewTemplate/Global.
▪Print Each Topic on a New Page: if checked, will create a new page for each new Topic
▪Repeat Criterion specific fields before each topic: if checked, the criterion fields will appear before each topic making up the worksheet or before each repeating topic instance
▪Print Short Description Instead of Long Description: If checked, will print the short description instead of the long description
▪Skip Worksheet Criterion fileds: If checked, the fields you chose on a worksheet criterion level will not appear in the printed hard copy.
TOPICS Tab:
Choose which topics to be included and/or how many times you want the topic repeated.
E-MAIL A REVIEW TEMPLATE
From the toolbar, click the E-mail icon
SAVING A REVIEW TEMPLATE:
From the toolbar, click the 'Save' icon, (floppy disk)
EXPORTING A REVIEW TEMPLATE
to create a hard copy worksheet:
oFrom the toolbar, click on 'Export'. You will have the option to export to an Excel, Word, XML, HTML or an CSV document.
CLOSING A REVIEW TEMPLATE:
Click on the PDA Start Button and then Close
DELETING A REVIEW TEMPLATE:
From the folder items list, click on Review Template name, from the toolbar, click on red X, when prompted click 'Yes'
