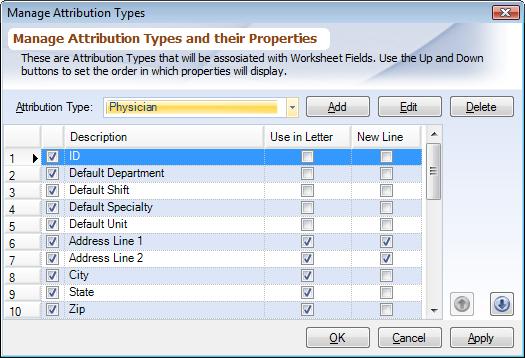
These are Attribution Types (system tables) that can be associated with a Worksheet Header and/or Worksheet Criterion Fields defined in a Review Template.
ADDING ATTRIBUTION TYPE:
▪From the toolbar, click on the Tools tab and then Management Console. From the PDA Start Button, click on Managing Attribution Types 'click 'Add'
▪Enter the desired Attribution Types, click 'OK'
|
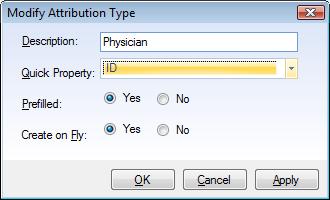
▪Quick Property: Select a Property which has been defined for this Attribution Type using the previous dialog. Quick Property is used to perform ID searches; it is typically defined as 'ID'. The Quick Property defined as ID will also display the ID in the Analyzer Results when Selecting Data Analyzer Parameters. Quick Property is not displayed when a new Attribution Type is being created. After saving the changes you need to come back to here and select Quick Property. This is because, no properties have been assigned to this new Attribution Type yet.
▪Prefilled Fields: Attribution Types If pre-filled is set to 'Yes' then the entire list of attribution objects can be retrieved for selection.
▪Create on the Fly: Managing Attribution Types. When you realize a particular physician is not in the list, then it can be created from there instead of going to Management Console
You must have rights in Roles -> Can Manage Attribution Type Objects to perform this function
|
EDITING ATTRIBUTION TYPE:
▪Select the newly added Attribution Types, click 'Edit', click Quick Property, and select 'ID'. This allows the system to conduct searches by ID. The Attribution Types of Facility, Practitioner, Unit, Department, Default, Deactivate, Roles and User cannot be edited. These are system defined tables. An icon displaying an unopened lock identifies these tables.
DELETING ATTRIBUTION TYPE:
▪Attribution Types and all of its contents can be deleted. Once deleted the Attribution Types values are stored in 'Default'
▪Select the Attribution Type, and click Delete
▪The Attribution Types and its values can only be restored by first re-adding the Attribution Types
ASSIGNMENT OF AN ATTRIBUTION TYPE PROPERTY:
▪Choose one or more attribution property to be identified for an Attribution Type. An Attribution Type automatically includes a field for 'Description.' When a value is added to Attribution Types, other fields can be assigned to further define the properties of the table itself. At a minimum, the ID property should be selected. For example: Attribution Types for Practitioner usually includes an element for ID, Department, Specialty, and Description. Therefore, the properties selected for the Attribution Types would include ID, Department, and Specialty
Adding Values to Attribution Types: See Training Guide Part I
MANAGING ATTRIBUTION TYPE PROPERTIES
A user defined element, i.e., property, that is associated with Attribution Types
CREATING ATTRIBUTION TYPE PROPERTY:
▪From the toolbar, click on the Tools tab and then Management Console. From the PDA Start Start Button, click on Manage Attribution Type Properties 'click 'Add'
▪Click the Add button on the right side to add a property or select from values already existing; type in the name of the property
•Property: Define the Type of property
oText (Free Text Field)
oBoolean (Y/N Field)
oNumeric (Number Field)
oObject (Pulls from Attribution Types)
oAttribution Type:
Type |
Purpose |
Example |
Boolean |
To hold yes/no values |
Is Board Certified |
Numeric |
To hold numerical data |
GMLOS,AMLOS |
Text |
To hold alphanumeric data |
ID |
Attribution Type |
Points to other Attribution Types |
Department, Specialty |
▪Select Attribution Types for the various property, if the field was defined as an 'Attribution Type'
•Common:
oYes = if the property is common across multiple Attribution Types objects, can assign a value to all fields at once
•Facility Specific:
oYes = Facility Specific; No = Enterprise-wide
RENAMING AN ATTRIBUTION PROPERTY:
▪Highlight the property to rename by clicking on it
▪Rename the Attribution Property, click OK
DELETING AN ATTRIBUTION PROPERTY:
▪Highlight the property to delete by clicking on it
▪Click on the Delete button on the right side, click OK
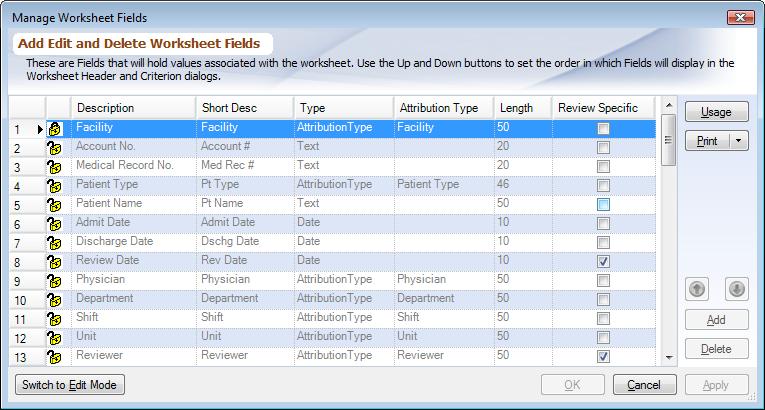
These are fields that will hold values that are associated with a worksheet. Worksheet Fields are user defined and can be established at the Worksheet Header and/or Worksheet Criterion Fields levels.
ADDING A NEW HEADER OR CRITERION FIELD:
oClick on the PDA Start Button and choose Manage Worksheet Fields
oClick on 'Switch to Edit Mode' to make changes
▪Field Name:
•Click on 'Add'. Type in the Field Name
▪Short Description:
•Repeat Field Name (Up to 10 Characters)
▪Field Type:
•Click on 'Type' use the drop down to define the field based on the following:
•Attribution Type (this is tied to a defined Attribution Type)
•Text (50 characters)
•Numeric
•Date
•Attribution Type:
oClick on Attribution Type if the field is an Attribution Type. Use the drop down to select which ATTRIBUTION TYPES
▪Length:
•Object length is based on the Attribution type Numeric based on value
•Date is automatically defined,
•Text is User Defined up to 50 characters
▪Review Specific: Review Specific works at the header level only. If demographic data for a specific record might be different between Review Templates, a field would be defined as Review Specific, i.e., specific to the review. For example: Review Date is a field usually defined as review specific. MR#1 might be reviewed in Blood Appropriateness with a sample date of 2/1/02. If MR#1 is reviewed in Patient Safety review, the Review Date would probably be different. Making the field Review Specific provides the ability to capture a different Review Date for the same record between Review Templates.
|
Primary Fields cannot be Review Specific
REVIEW TEMPLATE WORKSHEET FIELD USAGE REPORT:
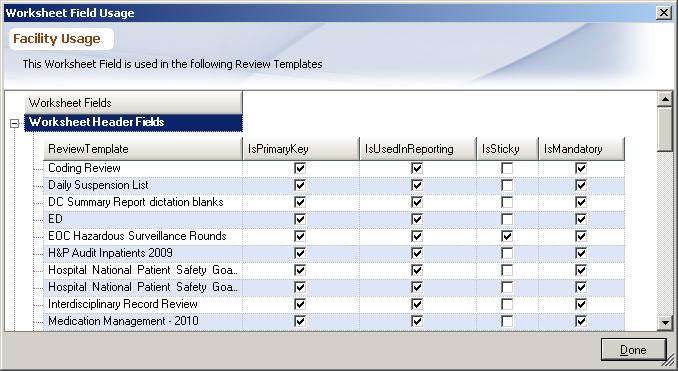
This report will allow you to print details about a Review Templates header, criterion and report fields. It also includes a list of Roles that have access to this Review Template.
▪Click on the PDA Start Button and choose Manage Worksheet Fields
▪Choose a specific value i.e., Unit, Department, Physician....
▪Click 'Usage'
|
Worksheets are the means by which data is entered into the system against specific Review Templates. A worksheet will not display the specific Topic/Criterion if the Role Assignment has not been defined.
ADDING A NEW WORKSHEET:
▪Click on desired Review Template then click, Worksheets icon
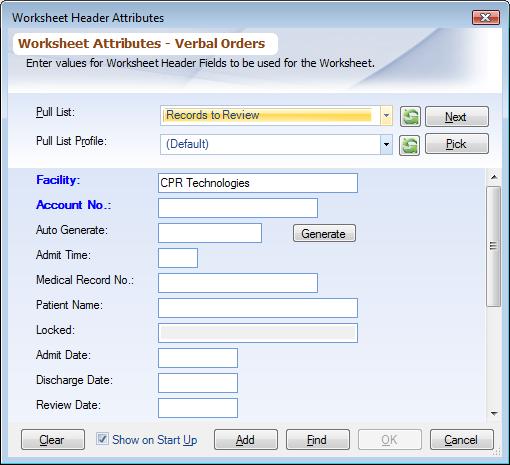
▪Enter desired header information and click 'Add'
▪Highlighted dark blue fields are those defined as Primary/Mandatory Fields. Fields highlighted light blue define a Mandatory.
|
Note: Link and ADT Hints in Worksheets: When in the Worksheet Data Entry dialog box and the same Primary key is used in another Review Template the two Worksheet header records will be linked.
Any changes made to the worksheet header field, which are NOT Review Specific will affect the other Review Template
SETTING Y/N/NA VALUES FOR WORKSHEET CRITERION:
▪Double click directly on the green check, red X or NA, or right-click and select Yes, No or NA or choose the green check, red X or NA from the toolbar. Clicking on F3 will also allow you to change the values. NOTE: Blue Flags are Mandatory Fields and worksheet cannot be saved until a value is set.
EDITING CRITERION ATTRIBUTES FOR WORKSHEET CRITERION:
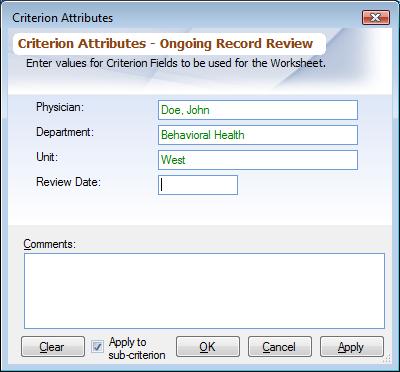
▪Highlight the criterion, right-click, select Edit Criterion Attributes, or select Edit Attributes from the toolbar. Enter desired data
|
REPEATING AN INSTANCE OF CRITERION:
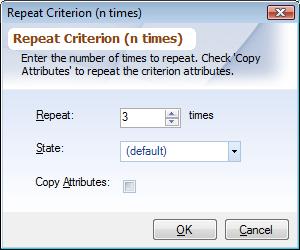
▪Highlight the criterion and right-click, select Repeat Criterion or select Repeat Criterion from the toolbar. If too many are repeated, highlight repeated criterion, right click and select Delete Repeated Criterion or click on Repeat criterion from the toolbar drop down menu and choose Delete Repeated Criterion.
▪To Repeat a criterion in multiples, highlight the criterion, right-click, select Repeat Criterion ‘n’ Times. You can repeat a criterion up to 50 times.
|
COMMENTS:
▪The comments section will allow you to enter any notes or comments to share with your team.
|
You can multiple select a group of worksheet criterion and the comment or changes will be made to all criterion.
•Highlight the first worksheet criteron, hold the Shift key down and click the last worksheet criterion. That will multiple select all criterion.
•Right click in (blue) highlighted, selected area and choose Edit Criterion Attributes, or select Edit Criterion Attributes from the toolbar. Enter desired comments
CLEAR DETAIL:
▪Right-click, select Clear Attributes to clear the data entered in criterion fields or choose Clear Attributes from the toolbar
SAVING A WORKSHEET:
From the toolbar, click on the 'Save' icon (Floppy disk)
TO VIEW OR EDIT WORKSHEETS YOU HAVE ENTERED:
a.Click on Worksheet icon. Enter the worksheet header value(s) of the worksheet you are searching for, if known.
b.If not, and the fields are left blank, click on Find at the bottom of the Worksheet Header Attributes box and Plato will return all worksheets entered into that Review Template.
|
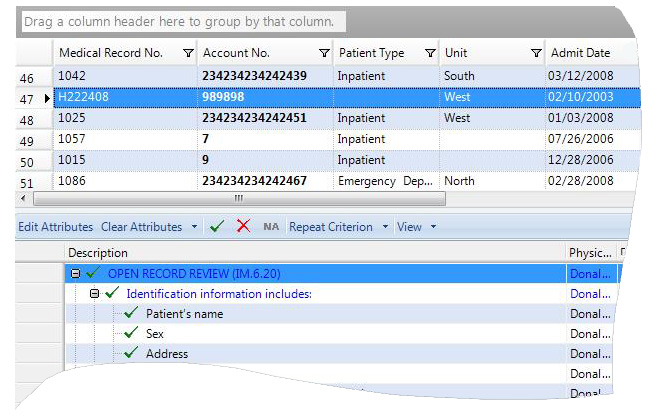
a.You will then see a split screen with the header fields above and the worksheet data below. You select by highlighting the row in the search list :
•Double click on the worksheet header in the search list box and edit the worksheet header field(s)
•Below, scroll through the criteria and edit answers, comments or worksheet criterion values for the chosen highlighted worksheet at the top.
The Search list can be collapsed giving you more room for criteron data entry. From the upper right of the "worksheet header box": Working With Worksheet Criterion, click on the double arrows pointing upwards.
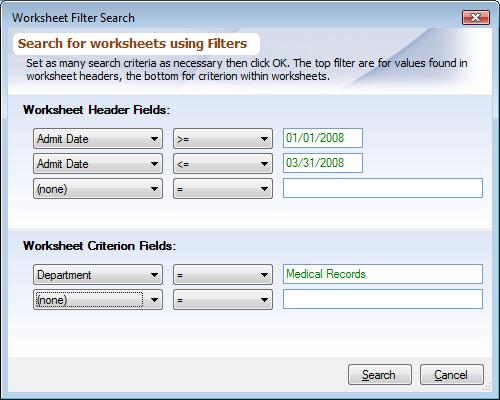
To search for worksheets by worksheet criterion fields or to find a range of values e.g., event date from 6/1/10 to 6/30/10; use the Filter Search. (See picture below)
▪Complete step 1 & 2 from above.
▪Right click to open the window below. Choose Filter search to open the next window.
|
MULTIPLE EDIT:
You can select more than one worksheet at a time and edit their header field values
▪Highlight multiple worksheets in the header search box and right click.
▪Make desired changes
FIND AND REPLACE WORKSHEET FIELDS:
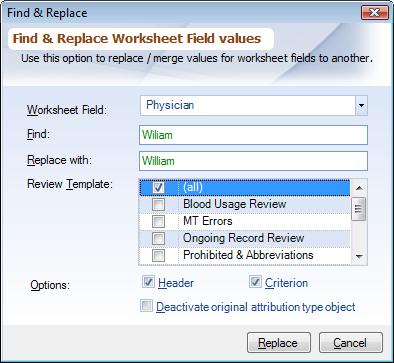
Worksheet header and criterion fields can now be replaced across the board.
▪From the Search box, highlight the worksheet header fields
▪Click on the Tools tab and then Find and Replace
▪Locate desired Worksheet Field, enter in Find box, Replace with, and then choose Review Template
▪Choose to replace in the Header or Criterion fields
|
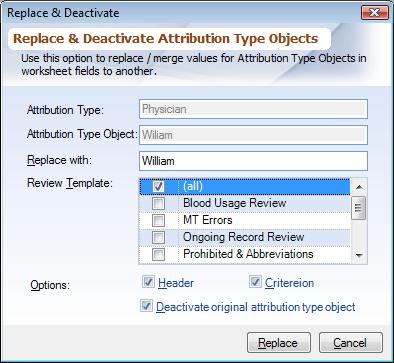
REPLACE AND DEACTIVATE ATTRIBUTION TYPE OBJECTS:
A similar option is available for attribution type objects, by choosing the pop-up context menu from Managing Attribution Type Objects.
|
SUMMARY WORKSHEETS:
Bulk data can now be entered in worksheets using Summary Worksheets. A summary worksheet can be used to enter historical data or if data was gathered using some other form outside of Plato. To create a summary worksheet include 'Is Summary Worksheet' field in the Worksheet Header of a Review Template.
▪From the toolbar, click on the PDA Start Button and then Review Template Assignment, then choose desired Review Template. Switch to Edit mode. At the time of data entry, set the field to 'Yes' to make that worksheet a summary worksheet.
|
PULL LIST
Higher Level Administrator function. Please see PullList, Managing Pull Lists, ADTInterface, Adding Editing Worksheets. Pull List is a great feature to allow you to create a list of Worksheets that you want to review. A Pull List can be created three ways:
oManually by hand entering the records to review from Managing Pull List Worksheets.
▪From the folder items list, click on desired Review Template, then click on the Pull List icon
▪From the toolbar, click 'New', name the pull list, and add any comments if desired.
▪From the Worksheet Work Area double click on pull list just named, then click on the Default, and then choose ' New' from toolbar.
▪Enter demographic information to create pull list
oSelecting records from the ADT Interface. When selecting from interface records, user can either hand pick the records or the program can randomly select records.
You will need to purchase the ADT Interface module before using this function.
oImport records from a standard ASCII file, which possibly could have been generated by an external system e.g. your host system from Importing records from ASCII file.
▪From the folder items list, click on desired Review Template, then click on Pull List icon
▪From the toolbar, click 'New'. Name the pull list, and add any comments if desired.
▪From the Worksheet Work Area double click on named pull list, and then click Default.
▪From the toolbar, click 'Import'
Creating a pull list through your ADT interface and Importing a Pull list from a flat file is a higher level administrative function. Please contact CPR Technologies support to help with the import process.
EDITING A WORKSHEET:
▪From the list area highlight specific worksheet to view worksheet results
▪Double-click to change demographic information
▪If changing results, from the toolbar, click the Save icon (Floppy disk)
DELETING A WORKSHEET:
▪Locate worksheet in list area highlight worksheet and from the toolbar, click on 'Delete' icon, when prompted click 'Yes'
PURGING A GROUP OF WORKSHEETS:
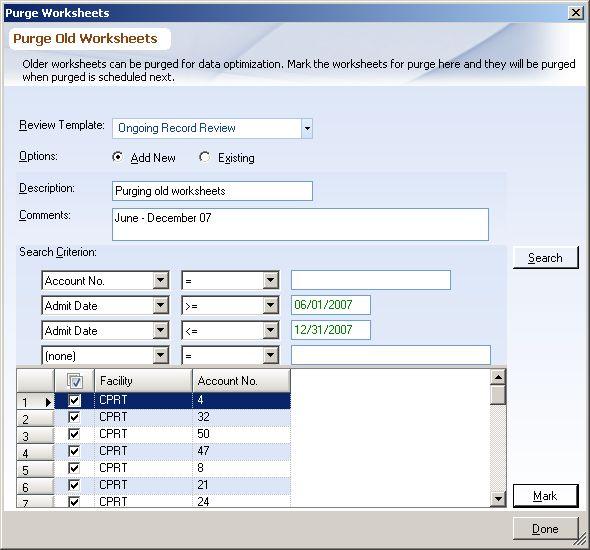
This function is used when a group of worksheets are no longer needed to report on or need to be kept for historical purposes.
▪Click on the 'Tools' tab and then Purge
▪In the parameters box choose the desired Review Template to purge worksheets
▪Choose the 'Add New' box
•Add desired description and comments
•In the Search Criterion section click on the drop down arrow and choose the values to run your search. Note: You can only search by Primary fields
|
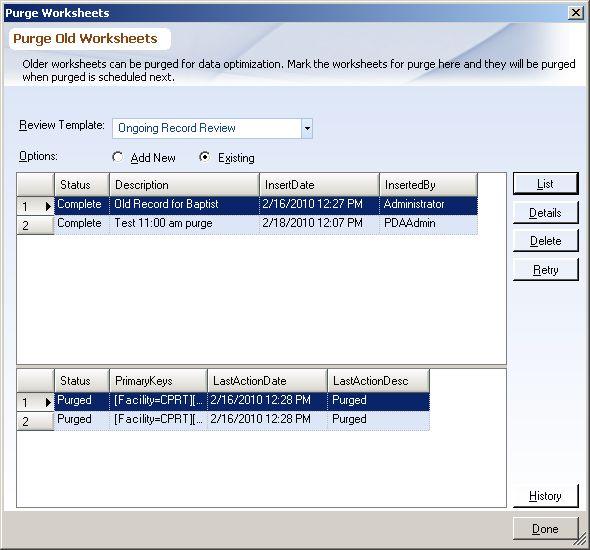
oChoose the 'Existing' box. In the upper portion of the box it will give you the history of worksheets purged
▪List - In the bottom section shows you the records that are marked for purging/action taken
▪Details - Gives you more details about the requested purge
▪Delete - Gives you the option to delete records immediatly
▪Retry - If your purge fails this gives you the option to try ti again
▪History - Will give you the Actions that have been taken
|
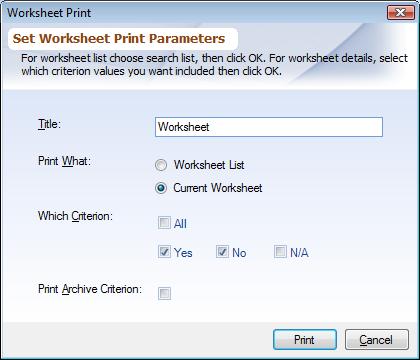
PRINTING THE RESULTS OF A WORKSHEET SEARCH OR SPECIFIC ACCOUNT:
oWith the worksheet open in Worksheet Work Area, from the toolbar, click the 'Print' icon. You will be prompted to print the list area or the specific worksheet along with specific values.
|
EXPORTING A WORKSHEET:
•With worksheet open in Worksheet Work Area, from the toolbar, click 'Export'' icon. You will be prompted to export the LIST AREA or the specific worksheet along with specific values.
•An Export dialog box will open with the option to export to an Excel, Word, XML, HTML or a CSV document. See picture above.
EMAILING A WORKSHEET:
▪With the worksheet open in Worksheet Work Area, from the toolbar, click the 'E-mail' icon. You will be prompted to e-mail the list area or the specific worksheet along with specific values.
